
To install LED lighting in sunshade products correctly, you need to treat the lighting as part of the sunshade assembly. The LED module, wiring, driver, connector, housing, and protection method must fit the mechanical structure and the outdoor environment at the same time.
What LED Lighting for Sunshade Products Means
Sunshade lighting usually refers to LED strips, linear LED modules, rigid light bars, or small waterproof LED modules integrated into shading products. Typical products include retractable awnings, pergolas, terrace covers, louvered roofs, canopy frames, umbrella systems, and façade shading structures.
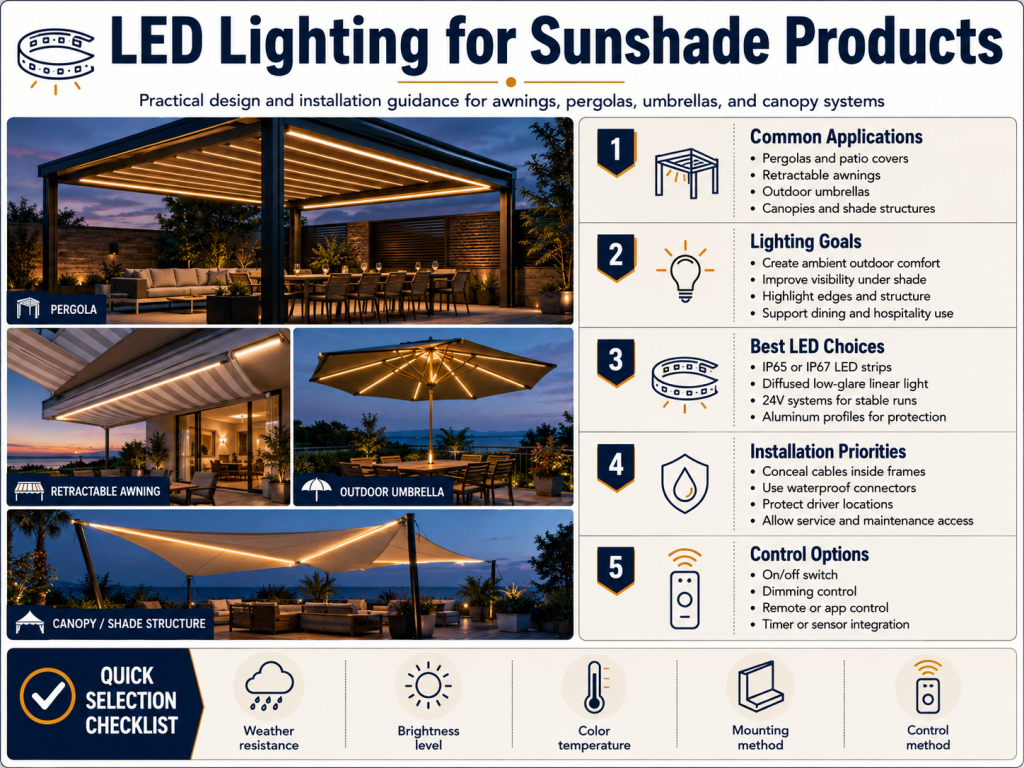
The lighting can provide task illumination, accent lighting, pathway guidance, hospitality ambience, or product differentiation for an OEM sunshade system. However, the technical challenge is not only brightness. The lighting must survive movement, outdoor moisture, UV exposure, temperature cycling, vibration, and limited service space.
Specifically, three design areas decide whether the project works well in the field:
- Wiring design, including voltage, current, cable length, polarity, routing, connectors, and voltage drop.
- Protection design, including IP rating, water drainage, UV resistance, sealing, corrosion resistance, and strain relief.
- Module fit, including physical dimensions, mounting method, heat dissipation, bend radius, diffuser clearance, and maintenance access.
That matters because a lighting component that performs well on a bench may fail when installed inside a narrow moving sunshade arm or under a sealed aluminum profile with poor drainage. In contrast, a well planned design can reduce installation time, improve quotation accuracy, and lower maintenance risk.
When This Guide Applies
This guide applies when LED lighting is installed directly into, onto, or beside sunshade products. It is relevant for new product development, project customization, field installation planning, and replacement lighting design.
Typical application scenarios
For a retractable awning, the LED module may be installed in the front bar, folding arm, or side profile. The cable must tolerate repeated movement and must not be pinched during operation.A fixed pergola may allow wiring to run through aluminum beams, but water ingress and condensation inside the profile require greater attention. In a louvered roof, the module may sit close to moving blades, making clearance and cable routing critical.
Outdoor hospitality projects also require consistent and predictable color appearance.. CCT, CRI, and color consistency can influence the visual result across multiple units. For OEM integration, repeatable module dimensions and connector position are often as important as optical output.
Where mistakes usually happen
Most field problems come from incomplete coordination between the mechanical design and the electrical design. An installer may select a waterproof LED strip but use an indoor connector. A product team may approve the light output but ignore voltage drop over a long arm. A designer may specify an IP rated module but install it in a channel that traps water.
Consequently, the correct question is not only “Which LED is bright enough?” The better question is “Which lighting assembly will fit, stay protected, and remain serviceable in this sunshade structure?”
Key Terms and Planning Parameters
Before selecting components, define the technical terms that affect specification, quotation, and installation. These terms are often found in drawings, datasheets, lighting schedules, and purchase requests.
| Term or Parameter | What It Means | Why It Matters for Sunshade Lighting |
|---|---|---|
| Voltage | The electrical potential supplied to the LED module, commonly 12V or 24V DC for low voltage systems. | It affects current, cable size, voltage drop, driver selection, and safety planning. |
| Wattage | The power consumed by the LED module, often stated as watts per meter or watts per module. | It determines total driver capacity, heat generation, and energy consumption. |
| Current | The electrical flow required by the load, calculated as watts divided by voltage for DC systems. | Higher current increases cable loss and may require larger wire or shorter runs. |
| IP Rating | An ingress protection code defined by IEC 60529 for resistance to dust and water. | It helps match the module, connector, and driver protection level to rain, splash, and cleaning exposure. |
| CCT | Correlated color temperature, usually measured in kelvin. | Warm white is common for hospitality and residential comfort, while cooler white may suit task lighting. |
| CRI | Color rendering index, which indicates how naturally colors appear under the light. | Higher CRI may matter for restaurants, retail terraces, and premium outdoor spaces. |
| SDCM | Standard deviation of color matching, used to describe color consistency between LED batches. | Lower SDCM helps maintain a consistent look across multiple sunshade units. |
| Dimming Method | The control method, such as PWM, 0-10V, DALI, DMX, or wireless control through a compatible driver. | It must match the driver, controller, cable layout, and project control system. |
| Operating Temperature | The ambient and internal temperature range in which the lighting assembly is expected to operate. | Sunshade profiles can become hot under sunlight, which affects LED life, adhesive strength, and driver performance. |
For most sunshade lighting designs, 24V DC is preferred when the run length is moderate or long. It reduces current compared with 12V for the same wattage. However, 12V may still be used for very short modules, legacy systems, or compact designs with matching drivers.
Core Technical Principles for Wiring
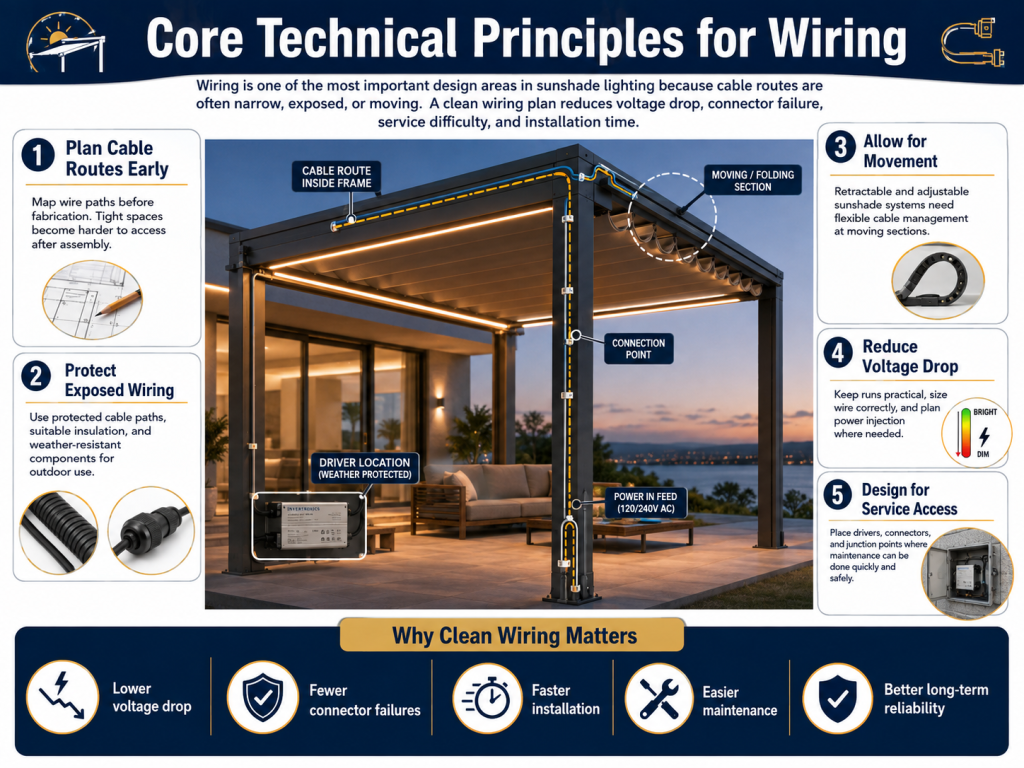
Wiring is one of the most important design areas in sunshade lighting because cable routes are often narrow, exposed, or moving. A clean wiring plan reduces voltage drop, connector failure, service difficulty, and installation time.
Calculate current before selecting cable
For constant voltage LED modules, current can be estimated by dividing total wattage by voltage. For example, a 48W LED load on a 24V system draws about 2A. The same 48W load on a 12V system draws about 4A. That difference affects cable heating, voltage drop, connector rating, and driver output capacity.
In practice, use the actual LED wattage from the datasheet and include the full installed length. Do not estimate from the visible lit length only if extra sections, corners, or module groups share the same power feed.
Control voltage drop at the module input
Voltage drop means the voltage delivered to the LED module is lower than the driver output because cable resistance consumes part of the voltage. This can cause dim ends, color shift, flicker, or unstable dimming. It is more visible on long runs and high current circuits.
Measure voltage at the LED input under full load, not only at the driver terminal. If the voltage is too low, reduce the run length, increase wire size, feed power from both ends, split the load into zones, or use a higher system voltage where suitable.
Protect moving cable sections
Retractable awnings and adjustable louvers create repeated cable movement. Specifically, cable must avoid sharp edges, hinge compression, and tight bend radii. Flexible cable, strain relief, protective sleeving, and fixed cable clamps help reduce fatigue.
For moving sunshade parts, do not rely on the LED strip solder pad as a mechanical anchor. The cable should be supported before it reaches the module connection point. This prevents solder joint cracks and intermittent contact.
Protection Requirements for Outdoor Sunshade Lighting
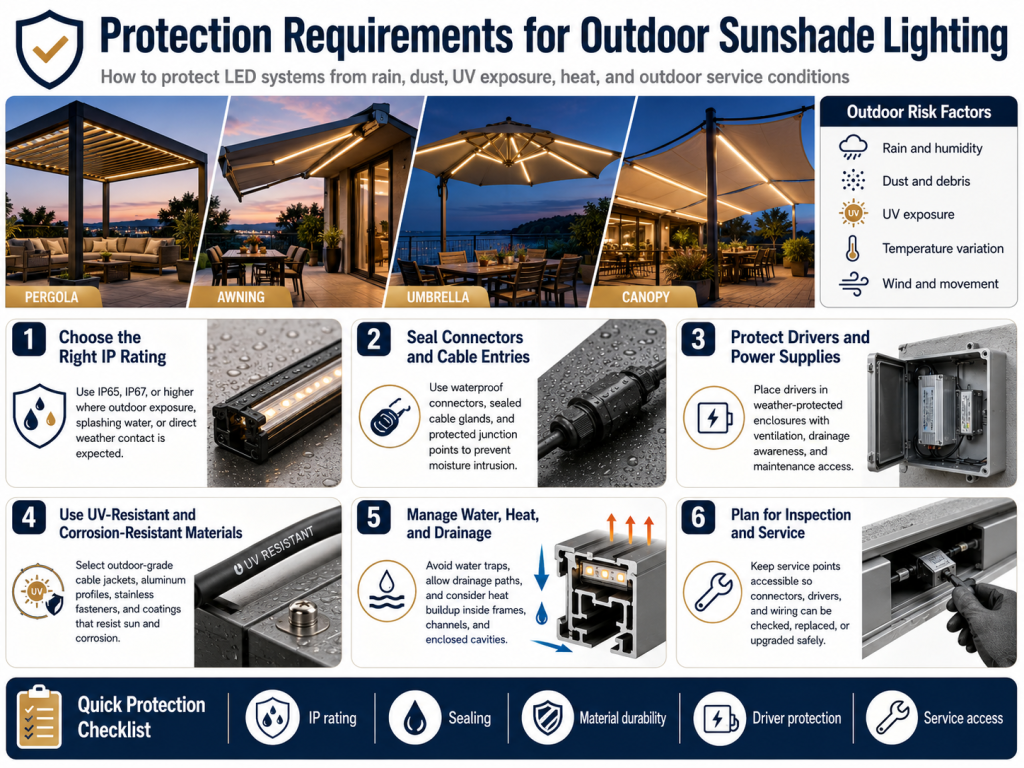
Protection design must consider direct water, wind driven rain, condensation, dust, insects, UV exposure, cleaning chemicals, and corrosion. An IP rating is useful, but it does not solve every installation condition by itself.
Choose IP rating according to exposure
IP20 or indoor modules are not suitable for exposed outdoor sunshade applications. IP65 may be suitable for splash protected locations. IP67 is often used where temporary water exposure or stronger sealing is needed. However, connectors, cable joints, drivers, and end caps must match the protection concept.
If the module is placed inside an aluminum channel, check whether the channel drains water or traps it. A sealed LED strip inside a water holding channel can still fail due to long term moisture contact, pressure changes, or capillary water movement.
Plan for UV and temperature
Outdoor sunshade products receive direct sunlight. UV can degrade low quality plastics, cable jackets, adhesives, lenses, and sealants. High profile temperature can also reduce LED output, accelerate lumen depreciation, and weaken adhesive tape.
Consequently, use UV resistant cable and appropriate mounting accessories. For LED strips, mechanical clips or profiles are safer than adhesive alone in hot locations. For rigid modules, confirm the screw fixing, clip tolerance, or snap fit retention under thermal expansion.
Consider corrosion and cleaning
Coastal projects, poolside installations, and hospitality terraces may expose lighting to salt, chlorine, detergents, and humidity. In these cases, connector material, screw material, PCB coating, and aluminum finish need attention. Stainless steel fasteners and protected connectors may be required depending on the project environment.
Compliance requirements can include CE, RoHS, UL, ETL, EMC testing, local electrical code, or IEC based safety and ingress protection references. The exact requirement depends on the market, installation type, and authority having jurisdiction. Do not assume certification from an IP rating alone.
Module Fit and Mechanical Integration
Module fit means the LED lighting component physically and thermally matches the sunshade product. This includes length, width, height, cut interval, connector position, mounting method, diffuser clearance, beam direction, and service access.
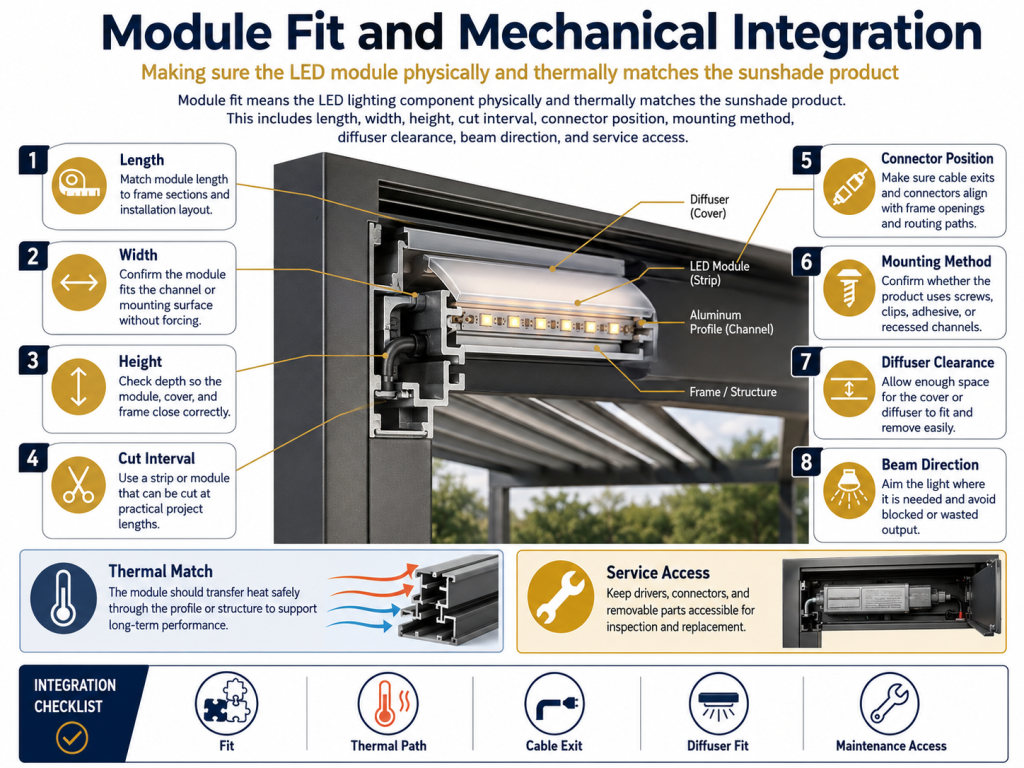
Check space before selecting output
Higher wattage modules usually need better heat dissipation. If the available space is shallow, narrow, or closed, a high power LED strip may run too hot. That can reduce lumen maintenance and create early failures. A lower wattage module with better optical placement may perform more reliably than a high wattage strip forced into a poor thermal space.
For example, a pergola beam with an aluminum channel and diffuser may support a linear LED strip if the strip has good contact with the profile. In contrast, a thin retractable awning arm with limited metal contact may need a lower power strip or a small rigid module designed for the available depth.
Match beam angle to the lighting task
Wide beam modules create soft ambient light but may produce glare if mounted close to eye level. Narrower optics can direct light toward tables, walkways, or architectural features. Diffusers reduce visible LED dots, but they also reduce luminous flux and may change the beam pattern.
When evaluating brightness, check lumen output after the diffuser or cover if possible. Photometric testing such as LM-79 can help when formal lighting performance data is required. For LED lifetime data, LM-80 and TM-21 may be relevant if available from the LED package or module supplier, but they do not replace thermal validation inside the sunshade structure.
Confirm serviceability
Sunshade lighting should be repairable without dismantling the entire product when possible. Modules, connectors, end caps, and drivers should be accessible through planned service points. This is especially important for hotel terraces, commercial outdoor dining areas, and high volume OEM products.
Step-by-Step Guide for Planning and Installation
A structured process helps prevent mismatches between drawings, samples, production parts, and field installation. Use the steps below before approving a final lighting design or quotation.
| Step | Action | Key Check | Project Impact |
|---|---|---|---|
| 1 | Define the lighting purpose and location. | Ambient light, task light, accent light, or integrated product feature. | Prevents over specification and supports realistic brightness targets. |
| 2 | Measure the installation space. | Profile width, depth, diffuser clearance, cable exit, and mounting tolerance. | Reduces sample changes and prevents module fit problems. |
| 3 | Select voltage and module type. | 12V or 24V constant voltage, flexible strip, rigid bar, or sealed module. | Controls wiring complexity, current, voltage drop, and assembly method. |
| 4 | Calculate wattage and current. | Total length, watts per meter, circuit grouping, and driver loading. | Improves driver sizing and avoids overloaded circuits. |
| 5 | Plan cable routing and connectors. | Cable length, bend radius, moving joints, strain relief, and sealing method. | Reduces installation labor and avoids intermittent electrical faults. |
| 6 | Confirm protection level. | IP rating, UV exposure, drainage, corrosion risk, and driver enclosure location. | Improves reliability in rain, humidity, heat, and cleaning conditions. |
| 7 | Test a sample assembly. | Voltage at module input, brightness, dimming, temperature, water exposure, and movement. | Finds problems before bulk production or site installation. |
| 8 | Document the installation method. | Wiring diagram, connector labels, polarity marks, torque notes, and service access. | Improves repeatability, quotation accuracy, and maintenance efficiency. |
For production projects, keep a controlled sample or golden sample after approval. This helps align purchasing, assembly, inspection, and after sales service. It also reduces disputes when future batches are compared against the approved design.
Technical Factors to Check
Technical checks should be completed before procurement and again before final installation. The purpose is to find hidden risks that are not obvious from a simple product datasheet.
| Factor | What to Check | Risk if Ignored | Recommended Verification |
|---|---|---|---|
| Driver capacity | Total wattage, output voltage, current limit, dimming compatibility, and installation temperature. | Overheating, flicker, shutdown, short life, or poor dimming behavior. | Load test the driver at full output and check temperature rise in its intended location. |
| Voltage drop | Cable length, wire gauge, current, feed position, and connector resistance. | Uneven brightness, dim far end, color shift, or unstable control. | Measure voltage at the first and last LED input under full load. |
| Connector sealing | Connector IP rating, gasket fit, cable diameter range, and assembly method. | Water ingress, corrosion, short circuit, or intermittent operation. | Inspect assembled connectors and perform suitable water exposure testing for the application. |
| Thermal path | Module wattage, aluminum contact, adhesive quality, air gap, and enclosure temperature. | Reduced lumen output, adhesive failure, and shorter LED life. | Run a temperature test after thermal stabilization in realistic conditions. |
| Mechanical clearance | Module height, diffuser position, moving parts, screw heads, and cable exits. | Pinched wires, damaged LEDs, rubbing noise, or product movement failure. | Operate the sunshade through full movement with the lighting installed. |
| Color consistency | CCT, CRI, SDCM, batch control, diffuser effect, and mixed module sources. | Visible color mismatch across units or sections. | Compare samples under the same driver, diffuser, and viewing condition. |
| Compliance | Market requirements for electrical safety, EMC, RoHS, IP testing, and local wiring code. | Approval delays, rework, rejected shipment, or installation restrictions. | Confirm required reports and labels before final quotation and production. |
These checks improve cost control because they reduce late redesign. They also help separate true product cost from installation risk. A cheaper LED module may cost more overall if it needs extra labor, extra sealing, larger cable, or frequent maintenance.
Common Misunderstandings
IP rated does not mean fully protected in every installation
An IP67 LED strip may resist defined test conditions, but field installation can introduce untested risks. Poorly sealed cut ends, wrong connector diameter, trapped water, cable capillary action, and damaged silicone coating can all create failure points.
Adhesive backing is not a structural fixing method
Adhesive tape helps position flexible LED strips, but heat, dust, humidity, and surface finish affect bonding. In sunshade products, mechanical support is often needed. Clips, channels, retaining covers, or properly designed grooves improve stability.
Brightness cannot be judged by wattage alone
Wattage shows power consumption, not useful light on the working area. Luminous flux, luminous efficacy, beam angle, diffuser loss, mounting height, and surface reflection all affect the final result. Therefore, compare installed performance, not only datasheet wattage.
A driver can be electrically correct but mechanically unsuitable
A driver may have the right voltage and wattage but still fail the project if it does not fit the enclosure, tolerate the ambient temperature, support the dimming method, or meet the required certification.
What This Means in Practice
In practice, the best lighting specification is usually the one that balances electrical load, mechanical fit, protection level, and service access. It is not always the brightest or the lowest cost option.
Consider a pergola project with four 2 meter LED lines installed inside aluminum beams. If each line uses 14.4W per meter at 24V, the total load is 115.2W. A driver should not be selected at exactly 120W without checking operating temperature, dimming load behavior, and manufacturer derating guidance. A larger or better ventilated driver may be more reliable.
Now consider a retractable awning with LED strips in moving arms. The electrical load may be small, but cable fatigue and pinch points become major risks. In this case, the installer should prioritize flexible cable, protected routing, strain relief, and repeated movement testing.
For an OEM sunshade product, the drawing should show module position, cable exit direction, connector type, driver location, polarity marking, and service procedure. This improves production repeatability and helps purchasing quote the correct accessories, not only the LED module itself.
Pro Tip / Field Experience
Before approving the final wiring layout, build one complete sunshade section with the actual LED module, driver, connector, cable, diffuser, and mounting hardware. Run it at full load, move the mechanism repeatedly if applicable, and then inspect cable stress points. Many failures are not caused by the LED itself. They are caused by cable routing, connector assembly, or heat inside the installed profile.
Testing, Inspection, and Maintenance Planning
Testing should reflect real installation conditions. A simple power on check is not enough for outdoor sunshade lighting. The lighting should be tested electrically, mechanically, thermally, and visually.
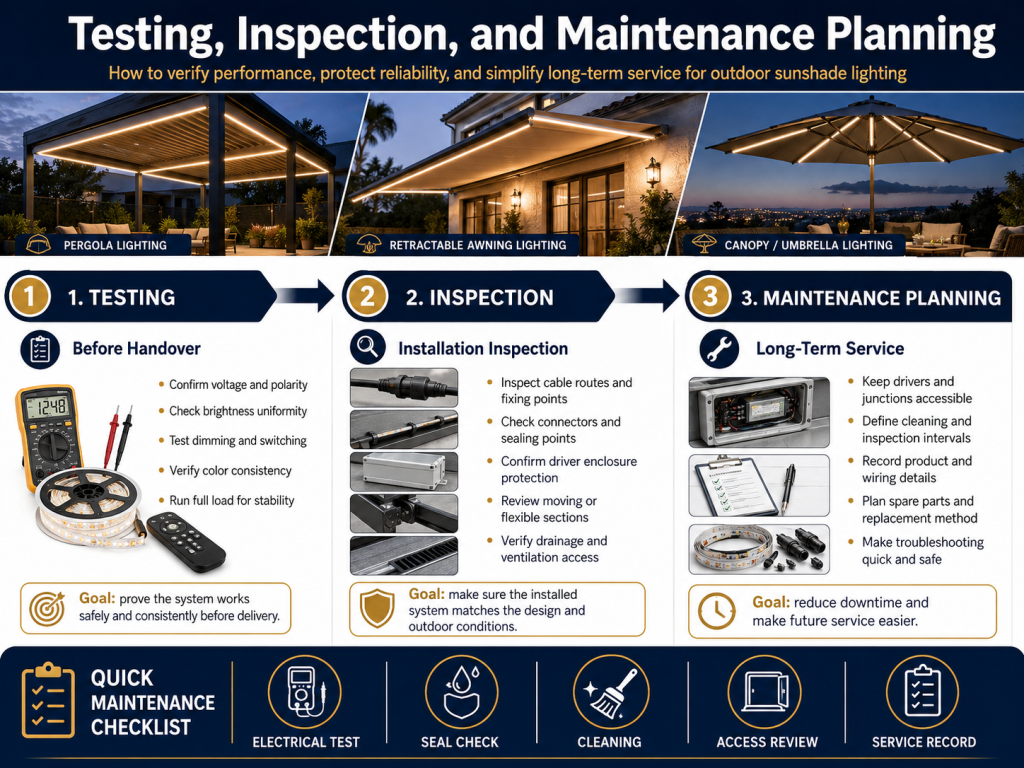
Electrical testing
Check polarity before energizing the system. Measure driver output voltage and voltage at the LED module input under full load. Confirm that current is within the expected range. If dimming is required, test dimming from minimum to maximum output and check for flicker, step changes, or control delay.
Protection testing
Inspect all end caps, solder joints, cable entries, and connector seals. For outdoor applications, use a water exposure test suitable for the expected installation. The test should consider orientation because a connector that survives vertical spray may fail when water sits on it horizontally.
Thermal testing
Run the lighting until the temperature stabilizes. Check the LED module, aluminum profile, cable near the module, and driver enclosure. High temperature can reduce LED life and damage adhesive. If the sunshade is installed in direct sunlight, consider testing under elevated ambient conditions.
Maintenance planning
Document which parts are replaceable and how they are accessed. Label driver outputs, controller channels, and cable routes when possible. Keep spare modules from the same specification if color consistency is critical. For large projects, record batch information, CCT, voltage, and connector type.
You can contact a technical team to confirm project details when the sunshade structure has unusual movement, long cable runs, strict compliance requirements, or limited space for drivers and connectors.