
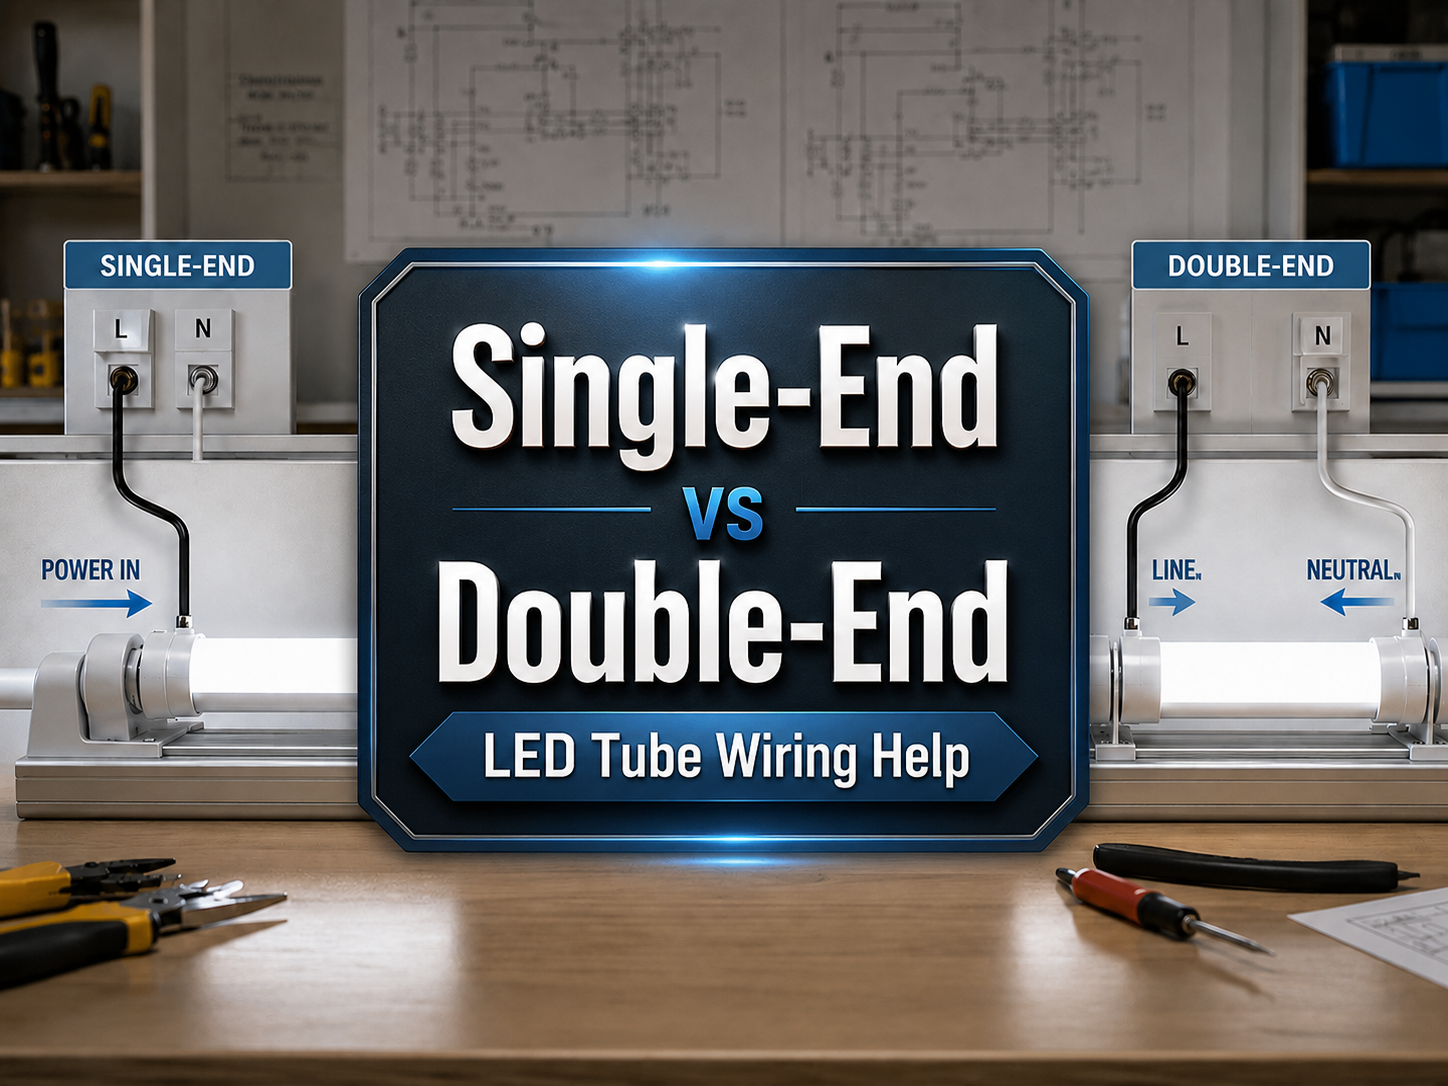
Single-end vs Double-end LED tube wiring are not interchangeable unless the tube is specifically designed for both methods. The correct installation depends on the LED tube type, the lamp holder style, the ballast status, and the manufacturer wiring diagram.
What Single-End vs Double-End LED Tube Wiring Means
LED tube wiring explains how power reaches the tube through the fixture lamp holders. These lamp holders are often called tombstones. In most line-voltage LED tube retrofits, installers use either single-ended input or double-ended input wiring.
Single-Ended LED Tube Wiring
In a single-ended LED tube, both live and neutral wires connect to the same end of the tube. The other end usually only holds the tube in place.
Because live and neutral are on the same side, they must stay separate. For this reason, single-ended LED tubes normally need non-shunted tombstones on the powered end. This helps prevent incorrect contact between the two wires.
Double-Ended LED Tube Wiring
In a double-ended LED tube, live power connects to one end of the tube, while neutral connects to the opposite end. This setup may feel more familiar to installers who have worked with fluorescent fixtures.
However, the ballast may still need to be removed or bypassed. This depends on the LED tube type and the wiring instructions from the manufacturer.
What Tombstones Mean
A tombstone is the lamp holder that grips the pins of a fluorescent or LED tube. It holds the tube in place and also helps carry power to the tube.
There are two common tombstone types. A shunted tombstone has internal contacts connected together. A non-shunted tombstone keeps the contacts separate.
This small part is important because the wrong tombstone can cause unsafe or incorrect LED tube wiring. For many retrofit problems, the tombstone is one of the first parts installers should check.
| Wiring Method | Power Connection | Typical Lampholder Requirement | Installation Impact |
|---|---|---|---|
| Single-ended input | Line and neutral connect to the same end of the tube. | Usually non-shunted tombstones on the powered end. | Requires careful separation of conductors and clear fixture labeling. |
| Double-ended input | Line connects to one end and neutral connects to the opposite end. | May use shunted or non-shunted tombstones depending on the tube design. | Requires correct end-to-end wiring and ballast bypass when specified. |
| Ballast-compatible Type A | Tube receives power through the existing fluorescent ballast. | Usually existing lampholders remain in place. | Requires ballast compatibility confirmation before installation. |
| External-driver Type C | Tube or lamp module receives output from a dedicated LED driver. | Depends on the system design. | Requires driver mounting, low-voltage or controlled output wiring, and system matching. |
When This Installation Help Applies
This guidance applies when you are retrofitting fluorescent tube fixtures with LED tubes, especially T8 and T5 style linear lamps used in offices, retail stores, schools, warehouses, parking areas, workshops, and industrial service rooms.
It is most relevant when the project includes ballast bypass LED tubes, also called Type B LED tubes. Type B tubes connect directly to mains voltage after the ballast is removed or disconnected. Because line voltage is present at the lampholders, wiring accuracy and fixture labeling are critical.
This page also helps procurement and engineering teams compare installation risk before approving one wiring style across a project. A small difference in tube input design can change labor time, accessory requirements, lampholder replacement, testing procedure, and maintenance instructions.
Common retrofit scenarios
- Replacing failed fluorescent lamps and ballasts with line-voltage LED tubes.
- Standardizing warehouse fixtures to reduce ballast maintenance.
- Converting office troffers while keeping existing fixture housings.
- Preparing an OEM or project quotation that must include tubes, lampholders, warning labels, and wiring instructions.
- Correcting flicker or no-light issues after an earlier retrofit.
Before You Start
Before opening the fixture, isolate power according to site lockout procedures and verify that the circuit is de-energized with a suitable tester. LED tube retrofit work often involves mains voltage, so installation should be performed by qualified personnel following local electrical code.
Do not rely only on fixture appearance. Two fixtures can look identical but contain different ballast types, shunted lampholders, emergency backup circuits, occupancy controls, or branch circuit wiring. Confirm the actual internal wiring before selecting the LED tube.
| Item To Check | Field Method | Installation Decision |
|---|---|---|
| Existing ballast | Read the ballast label and trace conductors to lampholders. | Decide whether the ballast stays, is bypassed, or is removed. |
| Lampholder type | Use a continuity tester to identify shunted or non-shunted contacts. | Replace tombstones if the tube requires a different style. |
| Supply voltage | Measure branch circuit voltage and compare with tube input rating. | Use only tubes rated for the site voltage range. |
| Fixture condition | Inspect sockets, wires, covers, grounding, and heat-damaged insulation. | Repair or replace damaged parts before installing LED tubes. |
| Control system | Check wall dimmers, relays, occupancy sensors, emergency circuits, and BMS controls. | Confirm compatibility before energizing the circuit. |
| Fixture environment | Check operating temperature, moisture, dust, vibration, and enclosure type. | Select suitable IP rating, fixture type, and wiring protection. |
Pro Tip: When surveying a site, open at least one fixture from each fixture group before quoting labor. Many buildings have mixed ballast generations, mixed tombstone styles, and previous repair wiring hidden behind identical diffusers. A short pre-installation survey can prevent missing lampholder costs, return visits, and schedule pressure during night or weekend retrofit work.
Key Components And Terms Installers Must Confirm
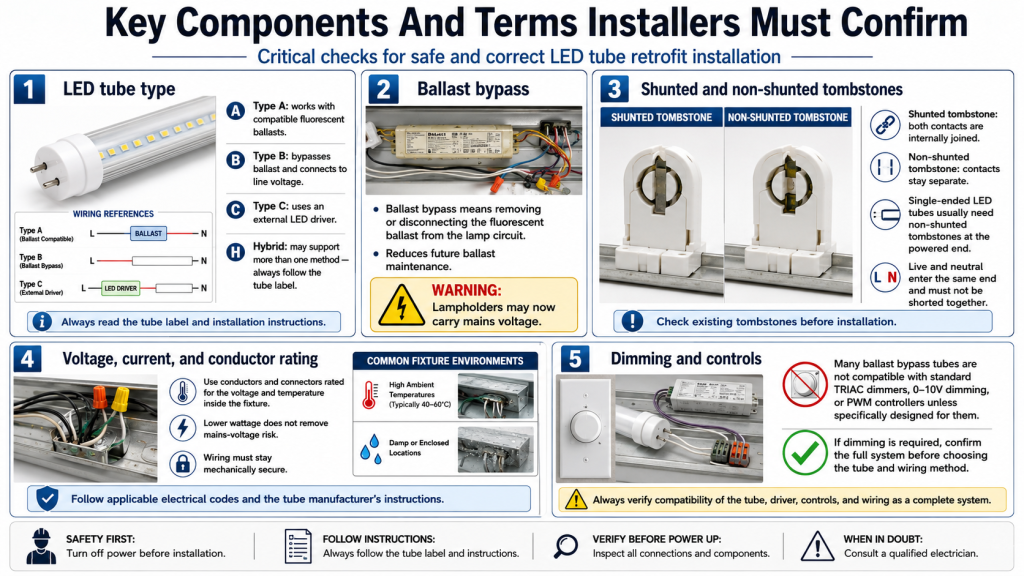
LED tube type
LED tube types differ by wiring method. Type A tubes operate with compatible fluorescent ballasts, while Type B tubes bypass the ballast and connect directly to line voltage. For Type C systems, an external LED driver is used. Hybrid tubes can support more than one method, but the exact wiring must still follow the tube label.
Ballast bypass
Ballast bypass means removing or disconnecting the fluorescent ballast from the lamp circuit. This reduces future ballast maintenance, but it also changes the safety condition of the fixture because the lampholders may now carry mains voltage.
Shunted and non-shunted tombstones
A shunted tombstone internally joins the two contacts on one lampholder. A non-shunted tombstone keeps them separate. Single-ended LED tubes usually need non-shunted tombstones at the powered end because live and neutral enter the same end and must not be shorted together.
Voltage, current, and conductor rating
LED tube retrofit wiring must use conductors and connectors suitable for the voltage and temperature inside the fixture. Even if the wattage is lower than the old fluorescent system, the wiring still carries mains voltage and must remain mechanically secure.
Dimming and controls
Many ballast bypass tubes are not compatible with standard TRIAC dimmers, 0-10V dimming circuits, or PWM controllers unless the tube is specifically designed for that control method. If dimming is required, confirm the full system before selecting the tube and wiring method.
Step-by-Step Installation Help
The steps below describe the general wiring logic for retrofit planning. Always follow the LED tube manufacturer wiring diagram and local electrical code. Do not use these steps to override product-specific instructions.
| Step | Action | Important Check | Risk If Skipped |
|---|---|---|---|
| 1 | Turn off power and verify the fixture is de-energized. | Use a proper voltage tester at the fixture input. | Shock hazard or unsafe work condition. |
| 2 | Remove the fluorescent lamp, diffuser, and ballast cover. | Keep parts organized for safe reassembly. | Lost covers, exposed wiring, or poor mechanical protection. |
| 3 | Identify tube type and wiring diagram. | Check whether the tube is single-ended, double-ended, Type A, Type B, or Type C. | Wrong wiring method and possible tube damage. |
| 4 | Inspect the ballast and existing fixture wiring. | Confirm whether the ballast must be disconnected or removed. | Flicker, overheating, or incompatible circuit operation. |
| 5 | Confirm lampholder type. | Test for shunted or non-shunted contacts. | Short circuit risk with single-ended input tubes. |
| 6 | Wire the fixture according to the LED tube diagram. | For single-ended tubes, connect line and neutral to the correct powered end. For double-ended tubes, connect line and neutral to opposite ends as specified. | No light, breaker trip, or unsafe energized pins. |
| 7 | Secure conductors and reinstall covers. | Use rated connectors, terminal blocks, strain relief, and insulation protection where required. | Loose connection, arcing, vibration failure, or maintenance hazard. |
| 8 | Apply retrofit labels and test operation. | Mark ballast bypass and wiring method clearly. | Future maintenance error and compliance concern. |
Single-ended wiring logic
For a single-ended Type B LED tube, line and neutral are connected to the same end of the lamp. The powered lampholder normally must be non-shunted. The opposite lampholder usually supports the tube mechanically, but the exact requirement depends on the tube design.
The main risk is placing live and neutral on a shunted tombstone. Since a shunted lampholder connects both contacts internally, this can create a direct short when power is applied. Always test the lampholder, even if the fixture label suggests a certain style.
Double-ended wiring logic
For a double-ended Type B LED tube, line is connected to one end of the tube and neutral to the other. This can reduce the need to replace certain lampholders, but the ballast still must be bypassed if the tube requires direct line voltage.
The main risk is assuming that every double-ended LED tube can use the old fluorescent ballast wiring. Many cannot. If the ballast remains in circuit with a ballast bypass tube, the lamp may flicker, fail to start, overheat, or fail prematurely.
Safety, Compliance, And Maintenance Impact
LED tube retrofit wiring affects more than whether the lamp turns on. It changes the electrical condition of the fixture. A fixture that once had ballast-limited lamp output may now have line voltage at the lampholders. This must be clear to anyone who services the fixture later.
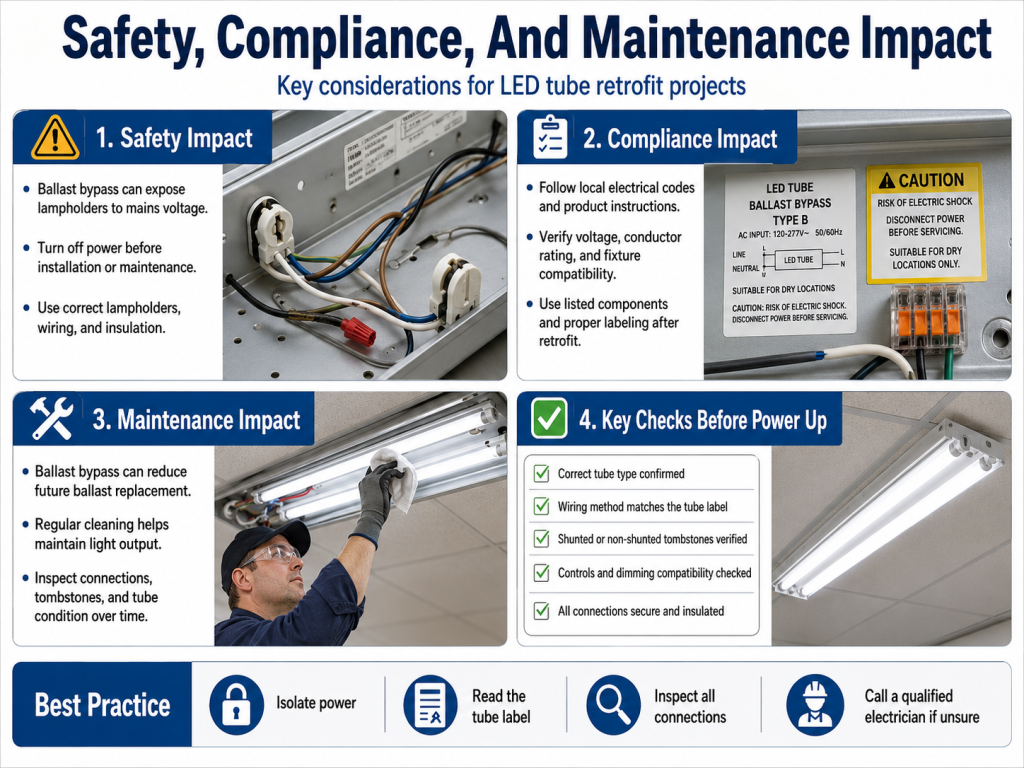
Use retrofit labels where required. Labels should indicate that the fixture has been modified, the ballast has been bypassed if applicable, and only compatible LED tubes should be installed. This reduces the chance that a future technician installs a fluorescent tube or incompatible LED tube into a modified fixture.
For projects requiring UL, ETL, CE, IEC, or other compliance considerations, confirm the retrofit tube listing, fixture modification rules, and local inspection requirements before installation. Do not assume that a listed tube automatically makes every modified fixture compliant in every region.
Moisture and dust also matter. In damp locations, parking garages, food service areas, or industrial spaces, verify the fixture IP rating and the condition of gaskets, covers, cable entries, and waterproof connectors. A dry-location retrofit tube installed in a damp fixture can create failure and safety risk.
Practical Installation Scenarios
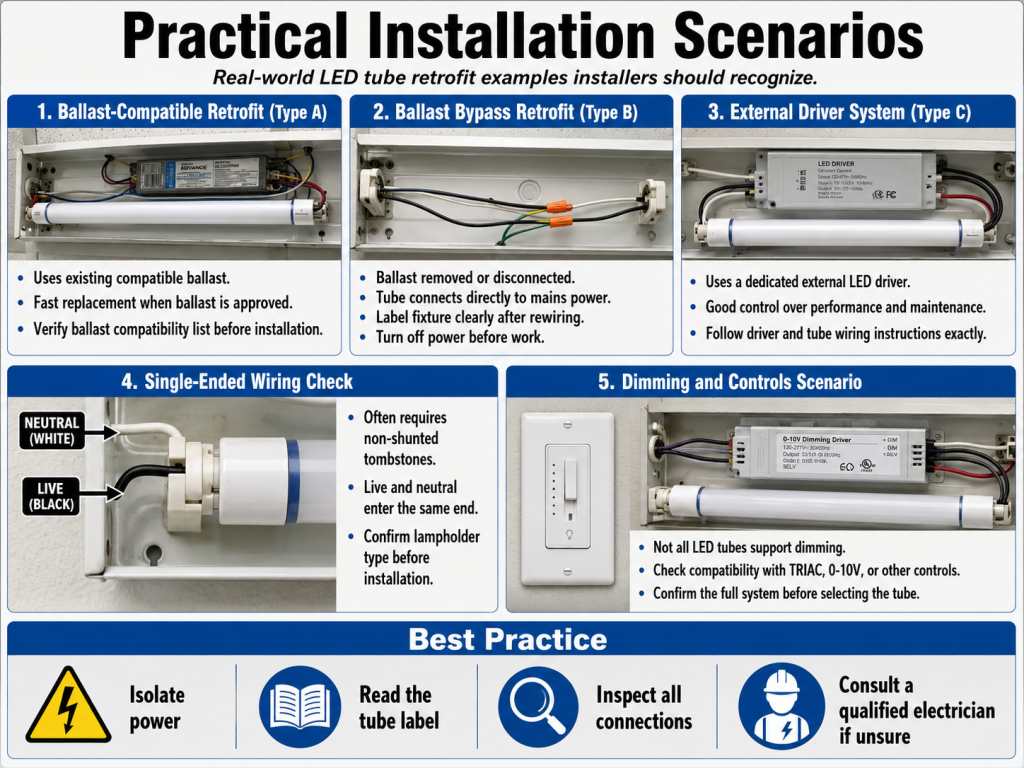
Office troffer retrofit
An office ceiling may contain many similar 2 by 4 troffers. Some may have instant-start ballasts with shunted tombstones, while others may have programmed-start ballasts with non-shunted tombstones. If the project uses single-ended Type B tubes, the installer may need to replace lampholders in part of the building.
Warehouse strip fixture retrofit
Warehouse strip fixtures often have longer branch circuit runs, higher mounting heights, and limited maintenance access. Double-ended Type B tubes may simplify socket use in some fixtures, but safe ballast bypass, conductor routing, and fixture labeling remain essential because future maintenance may require lift equipment.
Retail lighting maintenance
Retail stores often require fast installation outside business hours. A wiring mismatch can delay reopening areas or create inconsistent brightness across aisles. Pre-labeling tube cartons by wiring method and preparing accessory kits with tombstones, connectors, and labels can reduce rework.
Testing After Installation
Testing should be done before the fixture is fully closed and again after reassembly. The goal is to confirm correct wiring, stable operation, safe temperature behavior, and acceptable visual performance.
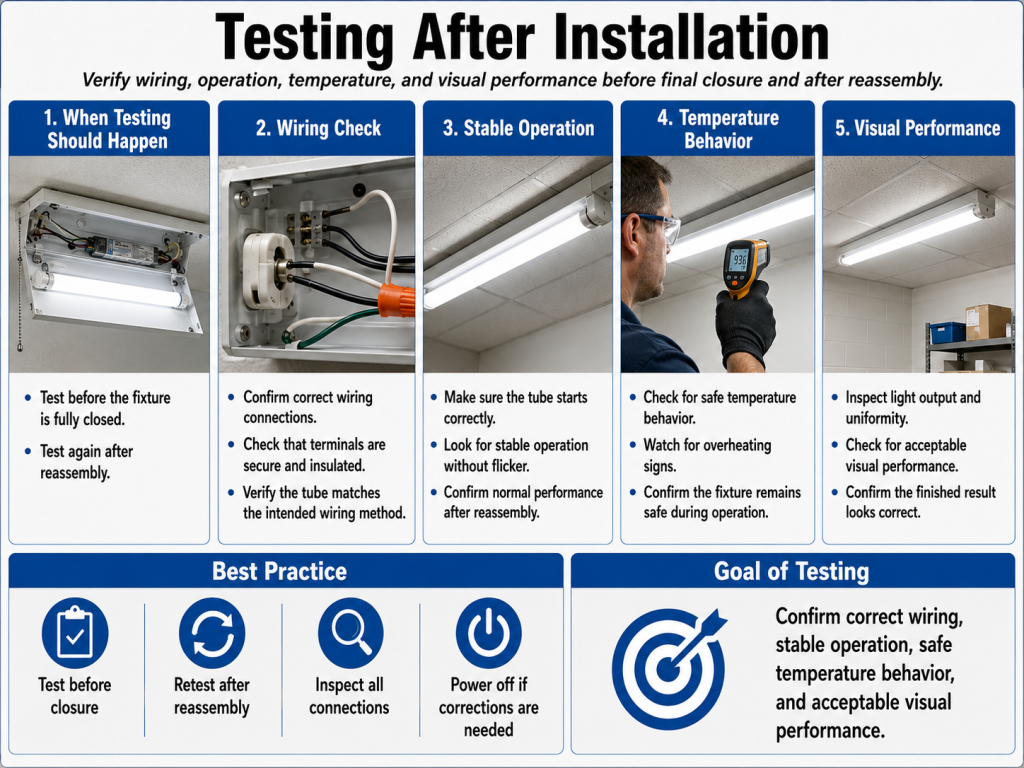
| Test | How To Check | Acceptable Result | Action If Failed |
|---|---|---|---|
| Continuity before energizing | Check for unintended shorts between line and neutral after rewiring. | No short circuit is present. | Recheck lampholder type and conductor placement. |
| Polarity and input placement | Compare wiring to the tube diagram before installing the tube. | Line and neutral match the required end or ends. | Correct wiring before power is applied. |
| Startup test | Energize the fixture and observe lamp ignition. | All tubes start without flicker or delay outside normal specification. | Check ballast bypass, tombstone contact, and supply voltage. |
| Visual consistency | Compare brightness and color across fixtures. | No obvious dim lamp, dark end, or color mismatch. | Check tube batch, voltage supply, and socket contact quality. |
| Heat check | After operating time, inspect for unusual heat at lampholders, connectors, or wiring. | No abnormal hot spots or odor. | Turn off power and inspect for loose terminals or wrong wiring. |
| Control function | Test wall switches, sensors, relays, and emergency circuits. | Controls operate as designed. | Confirm control compatibility with the selected LED tube type. |
How To Avoid Common Installation Failures
Most LED tube wiring failures come from assumptions. Installers assume the tombstone type, assume the ballast can stay, or assume that a tube from another supplier uses the same wiring method. These assumptions are risky because LED tube products are not wired identically across all manufacturers.
Use a fixture survey form before the project starts. Record ballast model, lampholder type, voltage, fixture quantity, control method, ceiling height, and access restrictions. For large projects, keep a sample modified fixture or wiring photo approved by the project engineer before the full installation team proceeds.
| Prevention Point | Recommended Practice | Benefit |
|---|---|---|
| Wiring diagram control | Keep the approved tube wiring diagram on site and in the project file. | Reduces variation between installation teams. |
| Accessory planning | Order non-shunted tombstones, connectors, labels, and replacement wires when needed. | Prevents work stoppage during fixture conversion. |
| Fixture grouping | Group fixtures by ballast and lampholder type before installation. | Improves labor estimation and quotation accuracy. |
| Maintenance labeling | Label every modified fixture after ballast bypass. | Protects future technicians from wrong lamp replacement. |
| Sample approval | Complete and test one fixture type before full rollout. | Finds wiring issues before they affect the project schedule. |
What This Means In Practice
If speed and minimal socket replacement are important, double-ended LED tubes may be attractive where the tube design and fixture condition support that method. If a project standardizes on single-ended tubes, plan carefully for non-shunted lampholders and clear powered-end identification.
The best choice is not only the tube with the lowest unit price. It is the tube and wiring method that match the existing fixtures, site voltage, control system, maintenance plan, and local code requirements. Correct planning reduces labor variation, nuisance failures, safety concerns, and unexpected accessory costs.
If you are not sure whether an existing fixture supports single-ended or double-ended LED tubes, confirm the ballast type, tombstone style, and wiring diagram before purchase. You can contact a technical team with fixture photos and electrical details to confirm the correct installation method.