
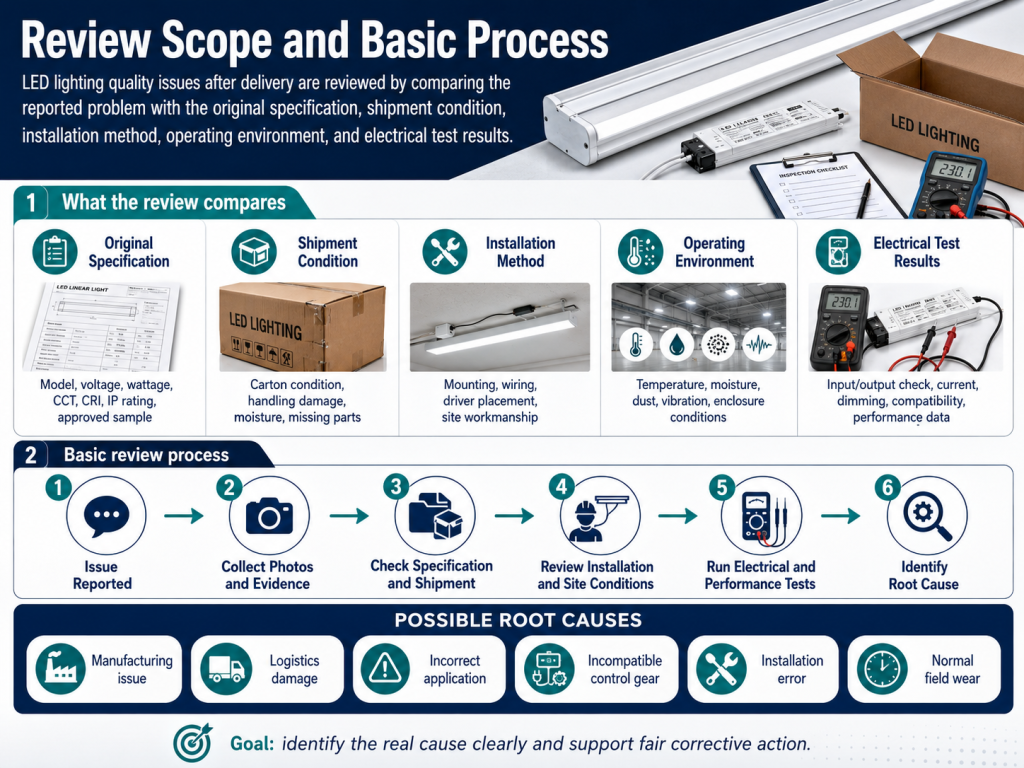
LED lighting quality issues after delivery are reviewed by comparing the reported problem with the original specification, shipment condition, installation method, operating environment, and electrical test results. The goal is to identify whether the issue is caused by manufacturing, logistics, incorrect application, incompatible control gear, installation error, or normal field wear.
Review Scope and Basic Process
What does an LED lighting quality review after delivery include?
It includes visual inspection, electrical testing, performance comparison, installation review, and documentation checking. The review normally starts with the complaint description and then checks whether the product matches the purchase order, datasheet, approved sample, and project requirements.
Typical review points include model number, batch number, input voltage, rated power, luminous flux, CCT, CRI, beam angle, IP rating, driver model, dimming method, cable length, mounting condition, and visible damage. This matters because a lighting fault can come from several sources. A flicker complaint, for example, may be related to the LED module, driver, dimmer, wiring length, or unstable supply voltage.
Who should participate in the review?
The review should involve the supplier technical team, buyer or project manager, installer, and site maintenance team when possible. Each party sees a different part of the problem.
The supplier can check production records, inspection reports, component traceability, and test limits. The installer can confirm wiring, mounting method, driver placement, and dimming connection. The maintenance team can report operating hours, ambient temperature, moisture exposure, switching frequency, and failure pattern. Clear responsibility helps reduce delays and avoids replacing products before the real cause is known.
What information should be collected before sending a quality claim?
You should collect photos, videos, labels, batch numbers, installation details, driver data, site voltage readings, and a clear failure description. A useful claim is specific and testable.
For example, “20 units flicker at low dimming level with a 0-10V control system” is more useful than “lights are poor quality.” Include how many units are affected, when the issue started, whether all units fail in the same zone, and whether the problem follows the product when moved to another circuit. This reduces back-and-forth communication and speeds up technical judgment.
| Reported Issue | Key Items to Check | Likely Review Method | Project Impact |
|---|---|---|---|
| No light output | Input voltage, driver output, polarity, connector condition, LED module continuity | Multimeter check, driver substitution, wiring inspection | Fast identification prevents unnecessary product replacement |
| Flicker or unstable dimming | Dimming protocol, dimmer load range, driver compatibility, cable routing, supply fluctuation | Control system test, waveform check, minimum load verification | Reduces commissioning delays and user complaints |
| Color difference | CCT, SDCM bin, batch number, installation surface, viewing angle, diffuser type | Visual comparison, spectrometer test, batch record review | Protects design consistency in visible areas |
| Low brightness | Luminous flux, wattage, driver current, voltage drop, lens or cover contamination | Power measurement, lux check, photometric comparison | Affects specification compliance and lighting levels |
| Water ingress | IP rating, sealing condition, cable gland, mounting orientation, drainage path | Visual inspection, site photo review, sample disassembly | Prevents repeated failures in outdoor or wet locations |
| Overheating | Ambient temperature, heat sink contact, enclosed space, driver location, operating current | Temperature measurement, thermal photo, installation review | Improves lifetime and reduces maintenance risk |
Technical Factors to Check
Which technical factors should be checked first?
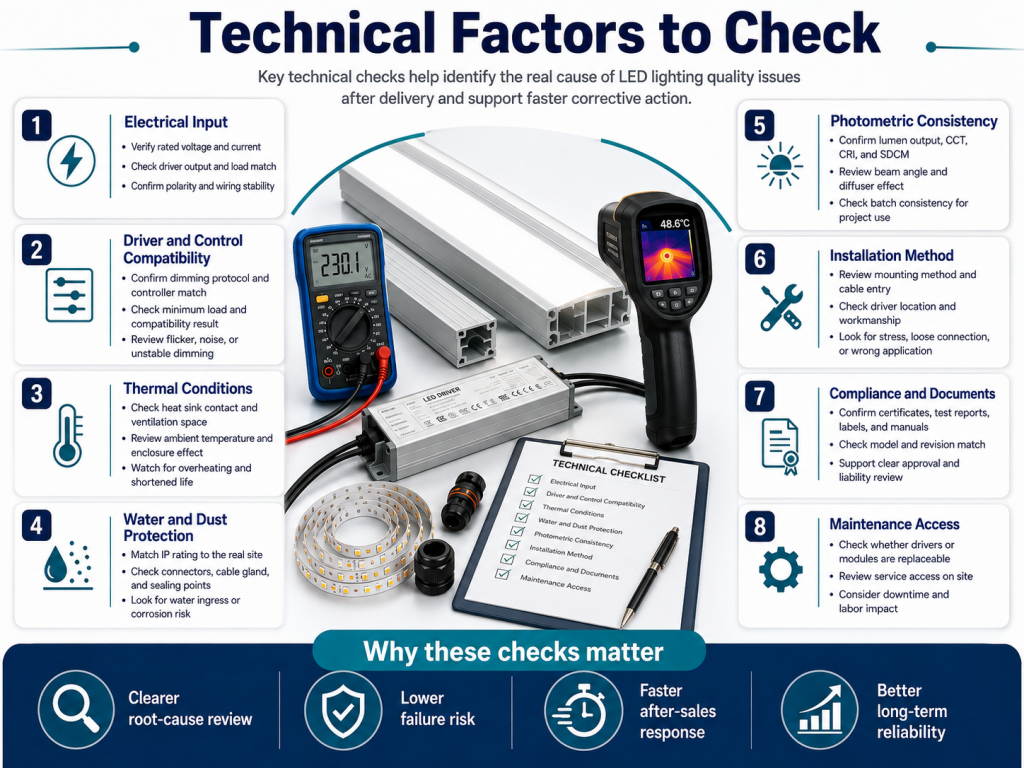
Voltage, current, wattage, driver output, polarity, and visible damage should be checked first. These parameters quickly show whether the LED product is receiving correct electrical power.
Measure voltage at the LED input, not only at the power supply terminals. Long cable runs, undersized wires, loose terminals, and overloaded circuits can create voltage drop. For constant current products, confirm that the driver output current matches the LED module rating. A wrong current can cause low brightness, overheating, reduced lifetime, or immediate failure.
How are brightness and lumen complaints reviewed?
Brightness complaints are reviewed by comparing measured light output and power consumption with the approved specification and site conditions. The review may use a lux meter on site or an integrating sphere and photometric test in a lab.
Luminous flux is the total light output from the fixture. Illuminance, measured in lux, is the light falling on a surface. A product may meet its lumen specification but still look dim if the beam angle, mounting height, surface reflectance, or spacing is wrong. For project review, check the original lighting layout, installed height, lens type, diffuser transmission, and whether the driver is delivering rated power.
How are CCT, CRI, and color consistency issues reviewed?
Color issues are reviewed by checking CCT, CRI, SDCM, batch records, and installation viewing conditions. CCT describes the appearance of white light, such as 3000K or 4000K. CRI describes how accurately colors appear under the light. SDCM describes color consistency within a tolerance range.
If units from different batches are mixed in one visible area, slight color variation may become noticeable. Surface materials can also change perceived color. Wood, stone, paint, diffuser materials, and lens aging can all affect appearance. For sensitive retail, hotel, cabinet, and architectural applications, the review should compare the installed luminaires against the approved sample under similar viewing conditions.
How are driver compatibility problems identified?
Driver compatibility problems are identified by checking input voltage, output type, rated current, rated power, dimming protocol, load range, and environmental rating. Many LED failures are not caused by the LED board alone.
Constant voltage LED strips need a suitable voltage driver, such as 12V or 24V DC. Constant current modules need a driver with the correct current range, such as 350mA, 700mA, or another specified value. If the driver has poor power factor, unstable output, wrong dimming interface, or insufficient thermal protection, the system may flicker, overheat, or fail early.
How are dimming and flicker complaints reviewed?
Dimming and flicker complaints are reviewed by checking the dimmer type, driver protocol, minimum load, wiring layout, and supply stability. The most common dimming methods include phase cut, 0-10V, DALI, PWM, and DMX, depending on the product and application.
A dimmable driver must match the control system. A phase-cut dimmer used with a non-compatible driver can cause flicker, buzzing, drop-out at low levels, or limited dimming range. Long control wires can also pick up noise if they are routed near power cables. In projects with many circuits, test one controlled zone first before assuming all luminaires are defective.
Pro Tip: When reviewing a post-delivery LED issue, ask for a short video showing the full circuit, driver label, dimmer model, and the fault behavior in one recording. This often reveals installation clues that photos miss, such as flicker only during dimming, failure only on one circuit, or abnormal driver noise under load.
| Parameter | What to Confirm | Why It Matters |
|---|---|---|
| Input voltage | AC or DC value at the luminaire or driver input under load | Incorrect voltage can cause no output, flicker, overheating, or driver damage |
| Output current | Driver current matches the LED module specification | Overcurrent accelerates thermal stress and lumen depreciation |
| Rated wattage | Total connected load is within driver capacity with suitable margin | Overloaded drivers may shut down or fail early |
| Dimming method | Driver and controller use the same protocol | Protocol mismatch is a common cause of flicker and poor low-end dimming |
| IP rating | Product rating matches moisture, dust, and cleaning exposure | Wrong protection level increases water ingress and corrosion risk |
| Thermal path | Heat sink, mounting surface, ventilation, and ambient temperature are acceptable | Poor heat dissipation reduces LED lifetime and may shift color |
| Batch traceability | Labels, production date, and lot number are readable | Traceability helps compare affected units with production records |
Installation and Environment Review
How can installation conditions cause quality issues after delivery?
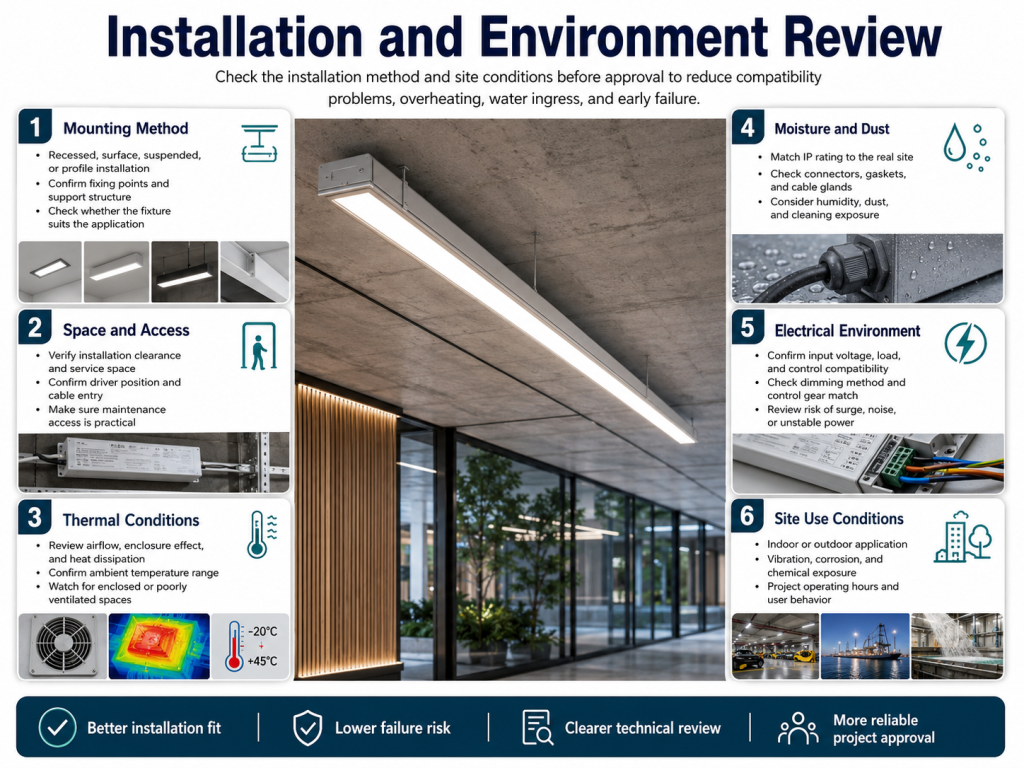
Installation conditions can cause quality issues when wiring, mounting, ventilation, sealing, or control gear does not match the product design. A product that passes factory inspection may still fail if the application environment is outside its rated limits.
Common examples include recessed fixtures installed without enough air space, LED strips mounted on non-conductive surfaces without aluminum profiles, outdoor luminaires installed with cable entry facing upward, or low-voltage lighting connected with excessive cable length. These conditions affect heat, voltage stability, moisture protection, and long-term reliability.
How should voltage drop be reviewed in low-voltage LED products?
Voltage drop should be reviewed by measuring voltage at the beginning and end of the LED run while the product is operating. It is not enough to measure the power supply output with no load.
In 12V or 24V LED strip systems, long cable runs and long strip lengths can cause the far end to appear dimmer. The review should check wire gauge, cable length, total wattage, connection points, and whether power is injected from one end or multiple points. Voltage drop affects brightness consistency and may create false quality complaints.
How do IP rating and outdoor conditions affect the review?
IP rating affects the review because water, dust, condensation, and cleaning methods can damage products that are not rated for the actual environment. IP rating describes protection against solid objects and water ingress.
For outdoor lighting, wet rooms, signage, landscape lighting, and industrial areas, check the declared IP rating, cable glands, end caps, seals, drainage, mounting angle, and exposure to pressure washing or chemical cleaning. A product rated for general damp protection may not be suitable for continuous water exposure or submerged use unless it is specifically designed for that condition.
How does thermal management affect post-delivery failures?
Poor thermal management can cause lumen depreciation, color shift, driver stress, and premature LED failure. LEDs are efficient, but they still generate heat that must move away from the LED junction.
The review should check ambient temperature, enclosure size, heat sink contact, mounting surface, ventilation, and driver placement. If an LED strip is installed inside a narrow sealed channel or a luminaire is covered by insulation, heat may build up beyond the intended operating range. Thermal stress may not cause immediate failure, but it can shorten service life and increase maintenance cost.
Testing, Evidence, and Compliance Review
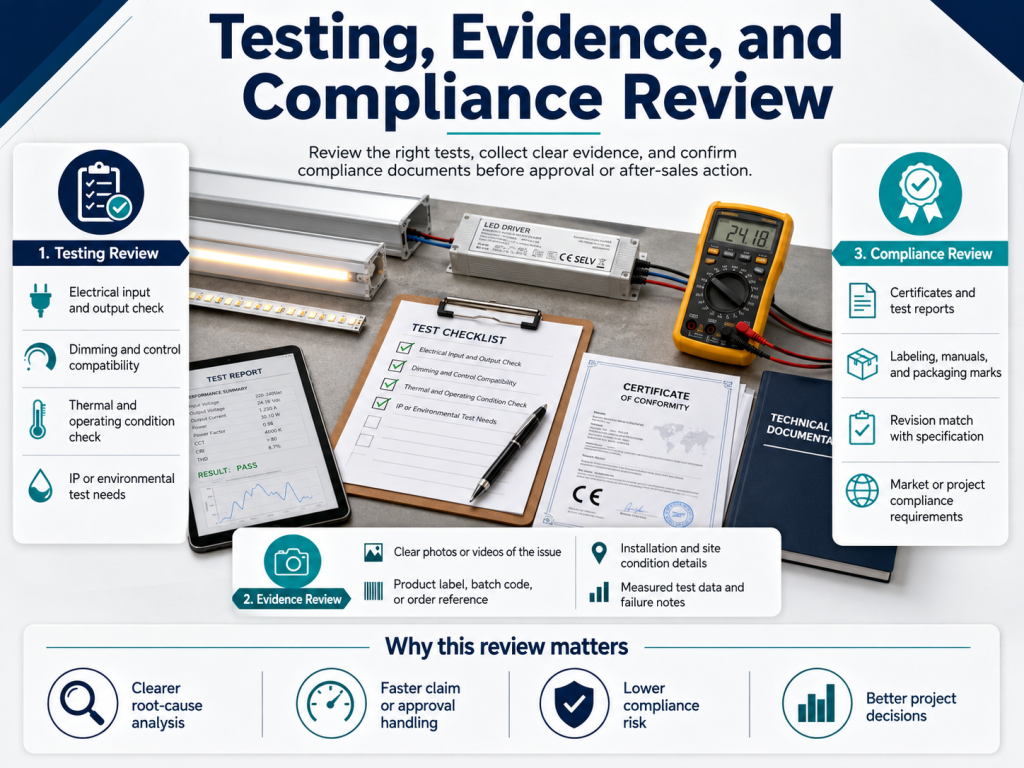
Which tests are useful for reviewing LED quality issues?
Useful tests include visual inspection, electrical measurement, temperature measurement, photometric testing, color measurement, driver substitution, and sample disassembly when appropriate. The test method should match the reported issue.
Light-output and colour reviews may use professional photometric testing based on LM-79 principles where applicable. Lifetime claims can be supported by LED package data related to LM-80 and TM-21 projections, although these documents do not replace field investigation. Electrical safety and market access may also require UL, ETL, CE, RoHS, EMC, or compliance with local electrical codes, depending on the product type and destination market.
How are logistics and transportation damage reviewed?
Transportation damage is reviewed by checking carton condition, packing method, product deformation, moisture marks, broken optics, loose components, and delivery records. Not every post-delivery issue is caused by production.
Heavy impact can damage LED modules, lenses, solder joints, connectors, or driver housings. Moisture during storage can affect packaging and exposed electrical parts. Photos of outer cartons before unpacking are useful, especially for large projects. If only products from one pallet or one carton are affected, logistics handling should be part of the review.
How are findings categorized after investigation?
Findings are usually categorized as manufacturing issue, specification mismatch, installation issue, transportation damage, misuse, environmental overstress, or normal tolerance. This classification determines the corrective action.
A manufacturing issue may require replacement, repair, process correction, or batch containment. A specification mismatch may require revised product selection. An installation issue may need rewiring, driver replacement, better heat dissipation, or improved sealing. Clear categorization protects the project schedule because it tells the team what to fix first and who must act.
What documents help support a fair review?
Documents such as purchase orders, approved samples, datasheets, inspection reports, packing lists, labels, installation photos, and test readings help support a fair review. The stronger the documentation, the easier it is to separate opinion from evidence.
For repeat orders, keep records of previous specifications and any approved changes. A small change in CCT tolerance, driver brand, lens angle, cable length, connector type, or dimming method can affect field performance. Documentation also helps confirm whether the delivered goods match the quoted and approved version.
| Document or Evidence | Best Format | How It Helps the Review |
|---|---|---|
| Product label and batch number | Clear close-up photo | Supports traceability and production record checking |
| Failure video | Short clip showing circuit and symptom | Helps identify flicker, intermittent output, or zone-specific problems |
| Voltage and current readings | Measured values under load | Confirms whether the product is operating within specification |
| Installation photos | Wide and close-up views | Shows mounting, wiring, ventilation, sealing, and control gear |
| Approved specification | Datasheet, quotation, or signed sample record | Defines the standard used for comparison |
| Site condition record | Temperature, moisture, usage pattern, location | Shows whether the environment matches the product rating |
Resolution and Prevention
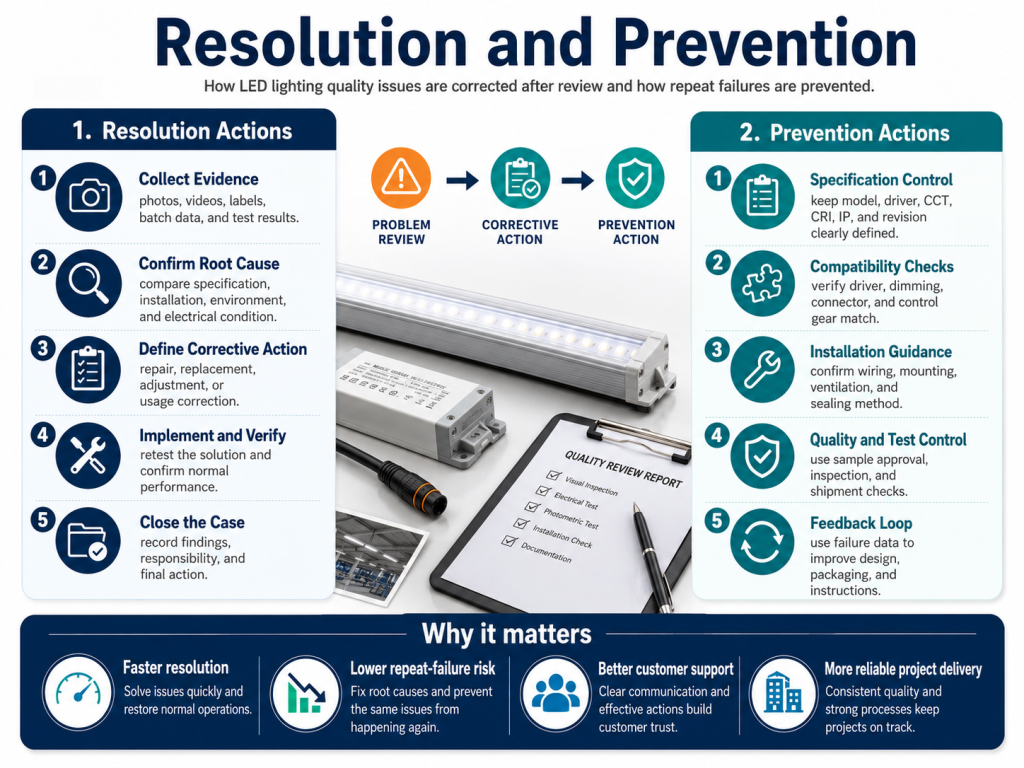
What actions are taken after the root cause is confirmed?
The action depends on the confirmed cause and may include replacement, repair, rework, driver change, installation correction, revised specification, or process improvement. A good resolution fixes the current problem and reduces the chance of recurrence.
A batch-specific issue may require the supplier to review retained samples, inspection records, and production process controls. Installation-related problems may call for revised wiring, additional power injection, better ventilation, or compatible dimming hardware. When the original specification was incomplete, future quotations should define the electrical, optical, environmental, and compliance requirements more clearly.
How can future post-delivery quality issues be reduced?
Future issues can be reduced by confirming specifications before production, approving samples, checking driver compatibility, validating installation conditions, and keeping traceable records. Prevention is usually cheaper than field correction.
For custom LED lighting, confirm critical details such as CCT tolerance, CRI, wattage, input voltage, driver model, dimming protocol, IP rating, cable length, connector type, mounting accessories, labeling, packing, and testing report requirements. For large projects, a pilot installation or mock-up area can reveal dimming, color, heat, or mounting problems before full deployment.
When should samples be returned for laboratory review?
Samples should be returned when the cause cannot be confirmed from photos, test readings, installation review, and remote troubleshooting. Returned samples allow deeper inspection of the LED board, driver, solder joints, connectors, optics, seals, and thermal path.
Before returning samples, mark the failure symptom, circuit location, operating hours, and installation condition. Do not repair or disassemble all failed units before the review, because original evidence may be lost. In some cases, one failed sample and one working sample from the same batch are useful for comparison.
How does a quality review affect warranty decisions?
A quality review affects warranty decisions by identifying whether the failure is within the agreed product responsibility and operating conditions. Warranty judgment should be based on evidence, not only on the presence of a failed unit.
If the product failed under correct voltage, compatible driver conditions, suitable temperature, proper IP application, and normal installation, the review may support a warranty action. If the failure was caused by overvoltage, water ingress beyond rating, incompatible dimming, blocked heat dissipation, unauthorized modification, or incorrect wiring, the resolution may require technical correction rather than a product warranty claim.