
The best choice depends on how closely an existing LED product matches the real project requirement. Use a standard product when the specification is already correct, use light customization when small changes close the gap, and use full custom LED development when the application needs a new electrical, optical, mechanical, thermal, or control design.
This decision affects more than product appearance. It changes quotation accuracy, sample timing, testing workload, certification review, maintenance risk, installation labor, and future production consistency. Consequently, the development level should be decided early, before drawings, mockups, purchase orders, or site schedules become fixed.
What Standard, Light Customization, and Full Custom LED Development Mean
In LED lighting projects, “custom” can mean very different things. One buyer may mean a different cable length. Another may mean a completely new luminaire with unique optics, housing, PCB layout, firmware, and compliance testing. These are not the same project type.
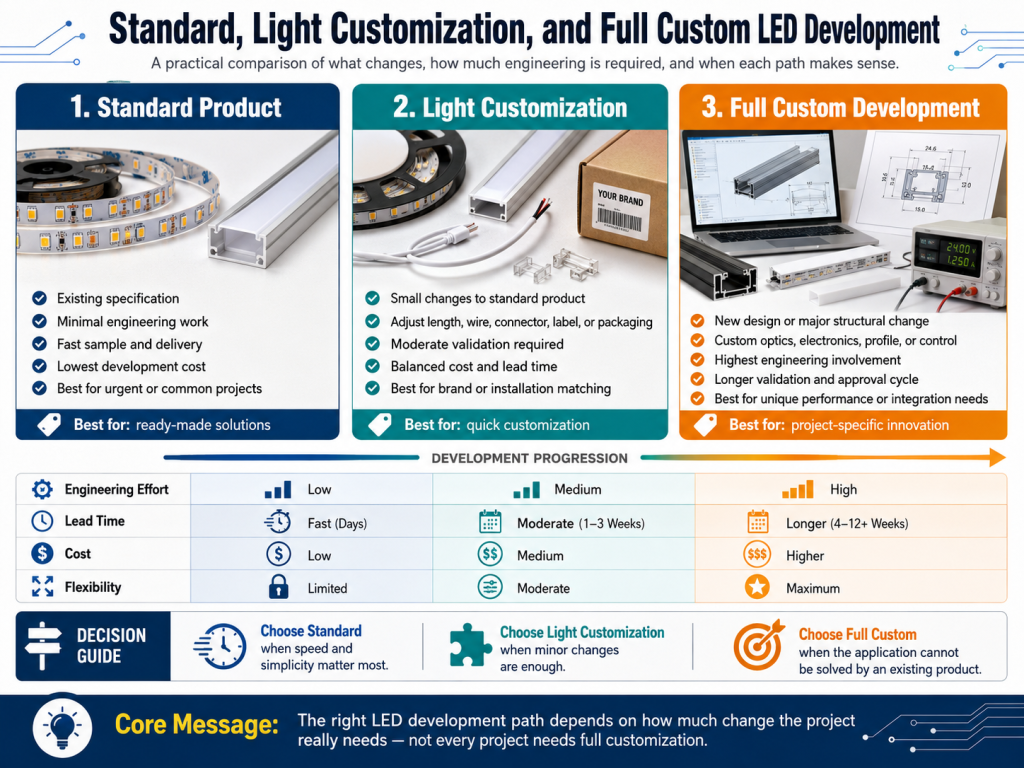
Specifically, standard products use existing approved specifications. Light customization modifies limited items without changing the core engineering platform. Full custom LED development creates or significantly redesigns the product platform. That matters because each path has a different cost, lead time, technical risk, and validation requirement.
| Development Path | Meaning | Typical Scope | Project Impact |
|---|---|---|---|
| Standard product | An existing LED product used according to its published specification. | Fixed voltage, wattage, CCT options, dimensions, optics, accessories, and installation method. | Fastest selection, lowest development risk, and usually the shortest lead time. |
| Light customization | A controlled modification based on an existing product platform. | CCT, CRI, cable length, connector, label, packaging, diffuser, mounting clip, finish, or accessory change. | Improves application fit while keeping engineering risk moderate. |
| Full custom development | A new or heavily modified LED product designed for a specific project or OEM requirement. | New PCB, LED layout, housing, optics, driver, firmware, thermal structure, tooling, or test plan. | Highest design flexibility, but also higher cost, longer validation, and greater schedule responsibility. |
A practical way to separate the three levels is to ask whether the product’s core performance platform changes. If voltage, power density, thermal path, optical structure, enclosure, and control method stay the same, the work may be light customization. However, if these core elements change, the project is likely a full development program.
When This Guide Applies
This guide applies when you need to decide whether to buy an existing LED product, request small modifications, or develop a dedicated solution. It is especially useful for OEM lighting integration, retail fixtures, furniture lighting, cabinet lighting, architectural features, equipment lighting, and commercial installation programs.
In these projects, the LED product is often part of a larger system. The final result depends on installation space, power supply layout, control method, heat dissipation, surface material, service access, and local electrical code. A product that looks acceptable in a catalog may fail in the field if the mounting surface traps heat or the driver does not support the required dimming method.
Common project triggers
- The available product is close to the requirement but not exact.
- The installation space has fixed dimensions or hidden mounting conditions.
- The project needs a specific color temperature, CRI, SDCM, or lumen output.
- The driver, controller, or dimmer has already been selected.
- The visible appearance must match furniture, signage, fixtures, or architectural details.
- The product needs special labeling, packaging, connector systems, or production traceability.
- The application requires review against UL, ETL, CE, RoHS, EMC, IEC, or local electrical requirements.
In contrast, if the project only needs general illumination and the site can accept standard dimensions, standard products are usually the most efficient path.
Key Terms and Parameters to Define Early
Clear definitions prevent misunderstanding between design teams, procurement teams, installers, and manufacturers. Many project delays start because terms such as “same brightness,” “warm white,” or “waterproof” are used without measurable values.
| Parameter | What It Means | Why It Matters |
|---|---|---|
| Voltage | The operating input, such as 12 VDC, 24 VDC, 48 VDC, or mains input through a driver. | Incorrect voltage can damage LEDs, reduce output, or create driver compatibility problems. |
| Wattage and current | The electrical load consumed by the LED product. | These values determine driver sizing, cable selection, voltage drop, and thermal load. |
| Luminous flux | Total visible light output, measured in lumens. | It helps compare brightness across product options and sample versions. |
| Luminous efficacy | Light output per watt, measured in lm/W. | It affects energy performance, heat generation, and operating cost. |
| CCT | Correlated color temperature, such as 2700 K, 3000 K, 4000 K, or 5000 K. | It affects visual tone, brand appearance, and interior design coordination. |
| CRI | Color rendering index, commonly CRI 80, CRI 90, or higher. | It affects how accurately objects, finishes, food, clothing, or displays appear. |
| SDCM | Standard deviation of color matching, used to describe color consistency. | Lower SDCM values reduce visible color difference between batches or installed sections. |
| IP rating | Ingress protection level against dust and water. | It affects use in damp, wet, outdoor, kitchen, bathroom, or industrial environments. |
| Dimming method | The control system, such as TRIAC, 0 to 10 V, DALI, PWM, DMX, or smart control. | Mismatch can cause flicker, limited dimming range, buzzing, or failure to turn off cleanly. |
| Thermal management | The method used to remove heat from LEDs, PCB, housing, or driver. | Poor heat control reduces lumen maintenance and increases early failure risk. |
These parameters should be documented before quotation. Otherwise, the supplier may quote a product that is commercially attractive but technically incomplete.
Core Technical Principles Behind the Decision

Use standard products when the risk of change is greater than the benefit
Standard products are usually the best option when their electrical, optical, mechanical, and environmental specifications already match the project. They are easier to quote, easier to sample, easier to replace, and easier to maintain. In many commercial projects, this reduces uncertainty more than a small custom feature would improve the result.
For example, a retail shelf lighting project may need a 24 VDC linear LED bar, 3000 K, CRI 90, fixed mounting clips, and a standard diffuser. If an existing model matches the required length, lumen output, beam angle, and driver system, a standard product is usually the right choice.
Use light customization when the base product is correct but the project interface is not
Light customization is useful when the core LED platform is suitable, but a project detail needs adjustment. Common examples include a 500 mm cable instead of 150 mm, a JST connector instead of bare wire, a custom label for assembly tracking, or a specific CCT bin for visual consistency.
This path often improves installation efficiency. For instance, pre-installed connectors may reduce wiring time in furniture or equipment integration. However, even simple changes should be controlled because connector polarity, wire gauge, cable length, and strain relief affect safety and reliability.
Use full custom development when the application requirement cannot be met by modification
Full custom development is appropriate when the product needs a new performance structure. This may include a different LED pitch, curved PCB, high-output thermal design, narrow beam lens, special housing profile, integrated sensor, firmware control, or a unique driver architecture.
Full development can produce the best project fit. However, it also requires engineering review, sample validation, pilot production, documentation control, and sometimes third-party testing. Consequently, it should be selected for a clear technical or commercial reason, not only because “custom” sounds more precise.
Step-by-Step Guide to Choose the Right Development Path
The most reliable process starts with requirements, not with product names. Begin by defining what the product must do in the finished installation. Then compare available products against those requirements and decide whether the gap is acceptable, adjustable, or fundamental.
| Step | Action | Decision Output |
|---|---|---|
| 1 | Define the application, environment, installation space, mounting method, and service access. | A clear use case that separates appearance needs from technical requirements. |
| 2 | Set electrical requirements, including voltage, wattage, current, driver type, cable length, and dimming method. | A power and control baseline that can be checked against standard products. |
| 3 | Set optical requirements, including lumen output, CCT, CRI, SDCM, beam angle, diffuser type, and glare tolerance. | A measurable lighting target for sample comparison and photometric testing. |
| 4 | Check mechanical limits, including length, width, height, bending need, mounting tolerance, connector position, and housing finish. | A physical fit assessment for fixtures, furniture, equipment, or architectural details. |
| 5 | Review environmental and compliance needs, including IP rating, IK rating, operating temperature, EMC, RoHS, CE, UL, ETL, or local code. | A compliance and durability requirement list for supplier review. |
| 6 | Compare standard product data sheets, drawings, IES files, sample results, and accessory options. | A decision on whether an existing product can be used without modification. |
| 7 | Identify gaps and classify them as minor interface changes or major platform changes. | A choice between light customization and full custom development. |
| 8 | Confirm sample plan, test method, approval criteria, packaging, labeling, lead time, MOQ, and production control. | A controlled project path before quotation and production release. |
This process prevents a common problem: approving a sample only by appearance and then discovering electrical, thermal, dimming, or compliance limitations during installation.
How the Decision Affects Specification, Installation, and Cost

Specification accuracy
Standard products require accurate matching to an existing data sheet. Light customization requires a controlled revision of that data sheet or a project-specific specification sheet. Full custom development requires a complete technical file, including drawings, materials, electrical parameters, optical targets, test methods, inspection standards, and revision control.
That matters because every unclear specification becomes a quotation assumption. Assumptions may lead to wrong LED bins, incorrect wire length, unsuitable driver selection, mismatched accessories, or inconsistent production batches.
Installation efficiency
Installation time is strongly affected by physical fit and wiring details. A standard product may be fast to obtain but slow to install if cable exits, mounting holes, clips, or connector types do not match the site. In contrast, light customization may reduce labor by supplying pre-cut cables, correct connectors, labeled polarity, or mounting accessories.
However, custom mechanical changes should be checked with real installation tolerances. A housing that fits in a drawing may not fit after surface finishing, adhesive thickness, screw clearance, or cabinet assembly variation.
Reliability and maintenance
LED reliability depends heavily on heat, current control, driver compatibility, moisture protection, mechanical stress, and component quality. A custom LED product can improve reliability if it is designed around the real environment. It can also increase risk if validation is skipped.
For example, increasing wattage in the same housing may raise LED junction temperature. Without thermal testing, this can reduce lumen maintenance and shorten useful life. Similarly, a longer cable may increase voltage drop, especially in low-voltage LED strip or linear lighting systems.
Compliance and testing
Compliance should be considered early. Changes to wire type, driver, enclosure, insulation, PCB layout, connector, power level, or installation method may affect certification or local electrical code review. Depending on the market, documentation may need to reference UL, ETL, CE, RoHS, EMC, IEC standards, LM-79 photometric testing, LM-80 LED package data, TM-21 lumen maintenance projection, IP testing, or other project-specific requirements.
Do not assume that a certified standard product remains covered after every modification. Some changes are minor. Others may require engineering review or retesting.
Selection Matrix for Real Project Scenarios
The following examples show how the three paths apply in realistic planning situations. They are not fixed rules, but they reflect common engineering judgment.
| Scenario | Best Path | Reason | Main Risk to Control |
|---|---|---|---|
| Retail display shelves need 24 VDC linear lighting, 3000 K, CRI 90, and standard aluminum channels. | Standard product | Common specification and predictable installation method. | Confirm driver capacity, voltage drop, and color consistency across shelves. |
| Furniture lighting needs the same LED bar but with 800 mm cables and factory-installed connectors. | Light customization | The base product is suitable, but the wiring interface must match assembly workflow. | Confirm connector rating, polarity, cable routing, and strain relief. |
| An equipment manufacturer needs a compact curved LED module with narrow beam optics and dedicated control firmware. | Full custom development | The electrical, optical, mechanical, and control platform is unique. | Confirm thermal performance, prototype validation, firmware stability, and compliance path. |
| An architectural cove uses a standard LED strip but needs a tighter SDCM bin and project packaging by floor. | Light customization | The product platform works, while color control and logistics need adjustment. | Confirm binning method, batch control, and labeling accuracy. |
| An outdoor feature requires high IP protection, impact resistance, special housing, and nonstandard mounting brackets. | Full custom development or engineered customization | The environment and mechanical load may exceed standard product limits. | Confirm IP rating, IK rating, corrosion resistance, sealing method, and drainage conditions. |
Technical Factors to Check Before Committing
Technical review should focus on the parameters that can change performance or risk. A small appearance change may be simple. A small electrical change may not be simple at all.
- Electrical load, including voltage, wattage, current, power factor where applicable, and driver headroom.
- Voltage drop, especially for long cable runs, long LED strip lengths, or centralized power supplies.
- Driver compatibility with the required dimming method, including TRIAC, 0 to 10 V, DALI, PWM, DMX, or smart control.
- Thermal path from LED package to PCB, housing, mounting surface, and surrounding air.
- Optical performance, including luminous flux, beam angle, diffuser transmission, glare, and uniformity.
- Color performance, including CCT, CRI, R9 where needed, and SDCM tolerance.
- Environmental rating, including IP rating, IK rating, humidity, cleaning exposure, UV exposure, and operating temperature.
- Mechanical fit, including mounting holes, clips, adhesive area, cable exit, connector position, and installation tolerance.
- Test evidence, including sample inspection, photometric data, temperature measurement, dimming test, burn-in, and packaging drop test where relevant.
- Compliance impact, including whether the requested change affects certification, labeling, or installation instructions.
Common Misunderstandings
“Custom” does not always mean better
A custom product is better only when it solves a defined problem. If a standard product already meets the requirement, customization may add cost, lead time, and approval complexity without improving field performance.
“Small change” does not always mean low risk
A cable length change may seem simple, but it can affect voltage drop, wire gauge, connector rating, and installation safety. A higher wattage request may require a new thermal design. A different diffuser may change lumen output and beam distribution.
“Sample approval” is not the same as production approval
A sample confirms direction, but production consistency depends on drawings, tolerances, LED binning, test criteria, packaging instructions, and inspection procedures. Without these controls, the approved sample may not represent future shipments.
“Certification” is not automatic after modification
Certification status depends on the exact product construction and applicable standard. Changes to enclosure, wiring, driver, PCB, insulation, or power level may require review. Always confirm the compliance path before final quotation.
What This Means in Practice
In practice, the correct development path is the one that solves the project requirement with the least unnecessary engineering change. Start with the standard product range. If one product meets the electrical, optical, mechanical, environmental, and compliance requirements, use it. If the base product is correct but installation details are wrong, request light customization. If no platform can meet the requirement safely and reliably, plan full custom LED development.
This approach keeps the project realistic. It protects cost control because you avoid tooling and validation when they are not needed. It improves installation efficiency because customized interfaces can remove site work. It supports reliability because thermal, electrical, and mechanical risks are reviewed before production. It also improves quotation quality because the supplier can price the correct scope instead of guessing.
For project execution, document the decision in a short specification file. Include drawings, electrical values, optical targets, sample requirements, environmental conditions, compliance expectations, packaging needs, labeling rules, and approval responsibilities. This file becomes the reference for quotation, sample production, inspection, and future repeat orders.
Pro Tip / Field Experience
Before requesting full custom development, ask for a gap review against existing platforms. In many LED projects, 80 percent of the requirement can be met by a standard product, and the remaining 20 percent can be solved with cable, connector, CCT, accessory, or packaging changes. This review often saves weeks of tooling discussion and prevents unnecessary sample cycles.
Risk-Control and Quote-Confirmation Checklist
A quotation should reflect the real engineering scope. If a quote does not identify the development level, technical assumptions, sample plan, and testing responsibility, it may look competitive but fail during execution.
| Confirmation Area | What to Check | Risk If Missed |
|---|---|---|
| Development level | Confirm whether the project is standard, light customization, or full custom development. | Wrong pricing, wrong lead time, or missing engineering work. |
| Electrical specification | Confirm voltage, wattage, current, driver type, dimming method, and cable length. | Driver mismatch, flicker, overheating, voltage drop, or unsafe wiring. |
| Optical target | Confirm lumen output, CCT, CRI, SDCM, beam angle, diffuser, and uniformity expectation. | Brightness complaints, color mismatch, glare, or inconsistent appearance. |
| Mechanical interface | Confirm drawings, tolerances, mounting method, cable exit, connectors, and accessory requirements. | Slow installation, field modification, product damage, or failed assembly. |
| Thermal condition | Confirm mounting surface, airflow, operating temperature, heat sink need, and power density. | Reduced lumen maintenance, early failure, or warranty dispute. |
| Compliance path | Confirm required standards, certification documents, labeling, and whether changes affect approvals. | Rejected installation, delayed shipment, or unexpected retesting. |
| Validation plan | Confirm sample quantity, test items, approval criteria, burn-in, and production inspection method. | Sample approval does not translate into stable production quality. |
| Commercial controls | Confirm MOQ, tooling cost, lead time, packaging, labeling, and repeat order consistency. | Budget changes, delivery delays, or inconsistent future supply. |